
20. Toolbox
The toolbox is a set of tools for pilots, student pilots and flight instructors. It is a separate module and has to be licensed for your club.
Where to find it
On the dashboard, right at the top, next to Reservations and Logbook, you will find the Toolbox button. It is the only entry point - there is deliberately no menu entry and no separate dashboard card, so that neither the menu nor the already long start page grows any further.
The button only appears if at least one of your clubs has the module. If the toolbox is licensed but no tool has been enabled yet, the page says so explicitly.

Aeronautical chart ICAO
The first tool is the official ICAO aeronautical chart of Switzerland by swisstopo. It opens full screen inside the app, so you do not have to look for it in a browser and find your way around there.
Four buttons sit on top of the chart:
- Back (top left) returns to the toolbox.
- My position shows your location on the chart. The browser will ask for permission the first time; the chart deliberately asks only when you press the button, so you are not prompted out of the blue.
- Full screen shows the chart across the whole display. On iPhone this button is missing because the installed app already runs without browser chrome there.
- Open in browser opens the same map section on map.geo.admin.ch - the way to the full feature set with search, drawing and further layers.
Zooming and panning work as usual. The ICAO chart is only available within a certain scale range: if you zoom in very far it disappears and the regular topographic map shows through - that is a property of the chart itself.
Important: The chart is a planning aid, not a means of navigation. It is updated once a year and contains no NOTAM. AIP and NOTAM apply for the flight. It also needs an internet connection - it is not available in the air.
Flight calculator
The flight calculator answers three questions from the same values: how dense the air is (density altitude), where you really are (true altitude) and how fast you are really flying (true airspeed). Work out the density altitude for take-off and you already have everything the other two need.
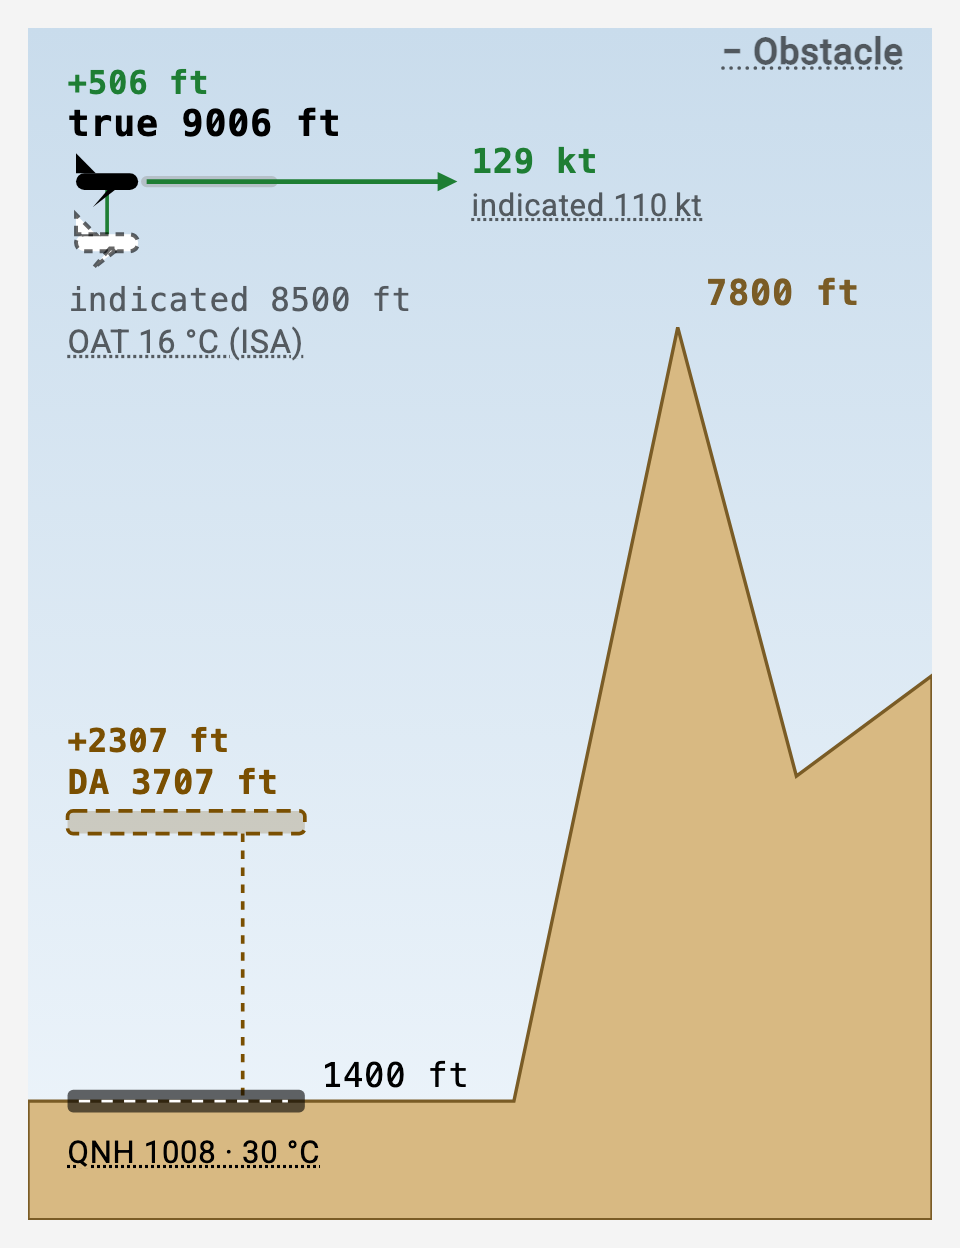
At the top sits the altitude ladder: a cross-section through the landscape in which all three figures stand as heights above the same ground. At the bottom the field, above it the density altitude as a dashed "ghost runway" — that is how high the take-off feels. Higher up your aircraft twice: dashed at the altitude the altimeter shows, solid at the true one. At its nose the airspeed arrow, behind it the indicated speed in pale grey. Below the altitudes stands the outside air temperature (OAT) at your flight level. Temperatures marked "(ISA)" are derived from the standard atmosphere — read values appear without the marker.
The calculator opens filled in — with a standard day (1013 hPa, 15 °C, field at 1500 ft, flight at 6500 ft doing 100 kt). All three answers are there immediately; you only adjust what is different for you.
Everything is set right in the picture — there is no form. Dragging adjusts roughly: pull the aircraft up or down and the indicated altitude follows — the true one recalculates immediately; the obstacle and the runway drag the same way. Tapping sets precisely: a tap on an element or an underlined label opens a small editor inside the picture, with plus/minus buttons and direct typing. In the ground editor you also pick the airfield — the field elevation is taken over. The temperature at altitude is set at the aircraft (tap the OAT line); it may stay empty and is then derived from the field temperature with the standard lapse rate. A read OAT flows into the true altitude and the exact airspeed — the way the rule of thumb is worked in the cockpit. The field temperature may stay empty too; the ISA standard temperature at field elevation then applies.
The obstacle (a ridge, a crest, a mast — the figure from your chart) is added with the "+ Obstacle" chip at the top right of the picture; then drag it to its elevation, and the true altitude tells you by how much you clear it. Deliberately not preset: the application knows no terrain and invents none. The "− Obstacle" chip in the same spot removes it again.
Density altitude — how the air feels to your aircraft: on a hot day at a high airfield the machine behaves as if it were considerably higher up. The figure you take into your flight manual. Below the result it also appears as a distance from the field — "the take-off feels like 2307 ft higher" says more than "3707 ft". On a very cold day with high pressure it sits below the field; the ladder then opens a shaft downwards, and the take-off is better than the field suggests.
True altitude — the altimeter always assumes a standard atmosphere. When the air is colder, you are lower than it reads. In the picture both aircraft sit above each other and you see at a glance which way it goes. The calculator also tells you what the altimeter has to read for you to really be at the altitude you want — and, with an obstacle added, by how much you clear it. That is the question that comes up in the mountains in winter.
True airspeed — in thinner air the reading lags behind while you actually go faster. You can see it on the airspeed arrow: the long arrow is the true speed, the pale stub behind it the indicated one. The difference is deliberately exaggerated, otherwise the two lengths would be indistinguishable.
Rule of thumb and exact calculation
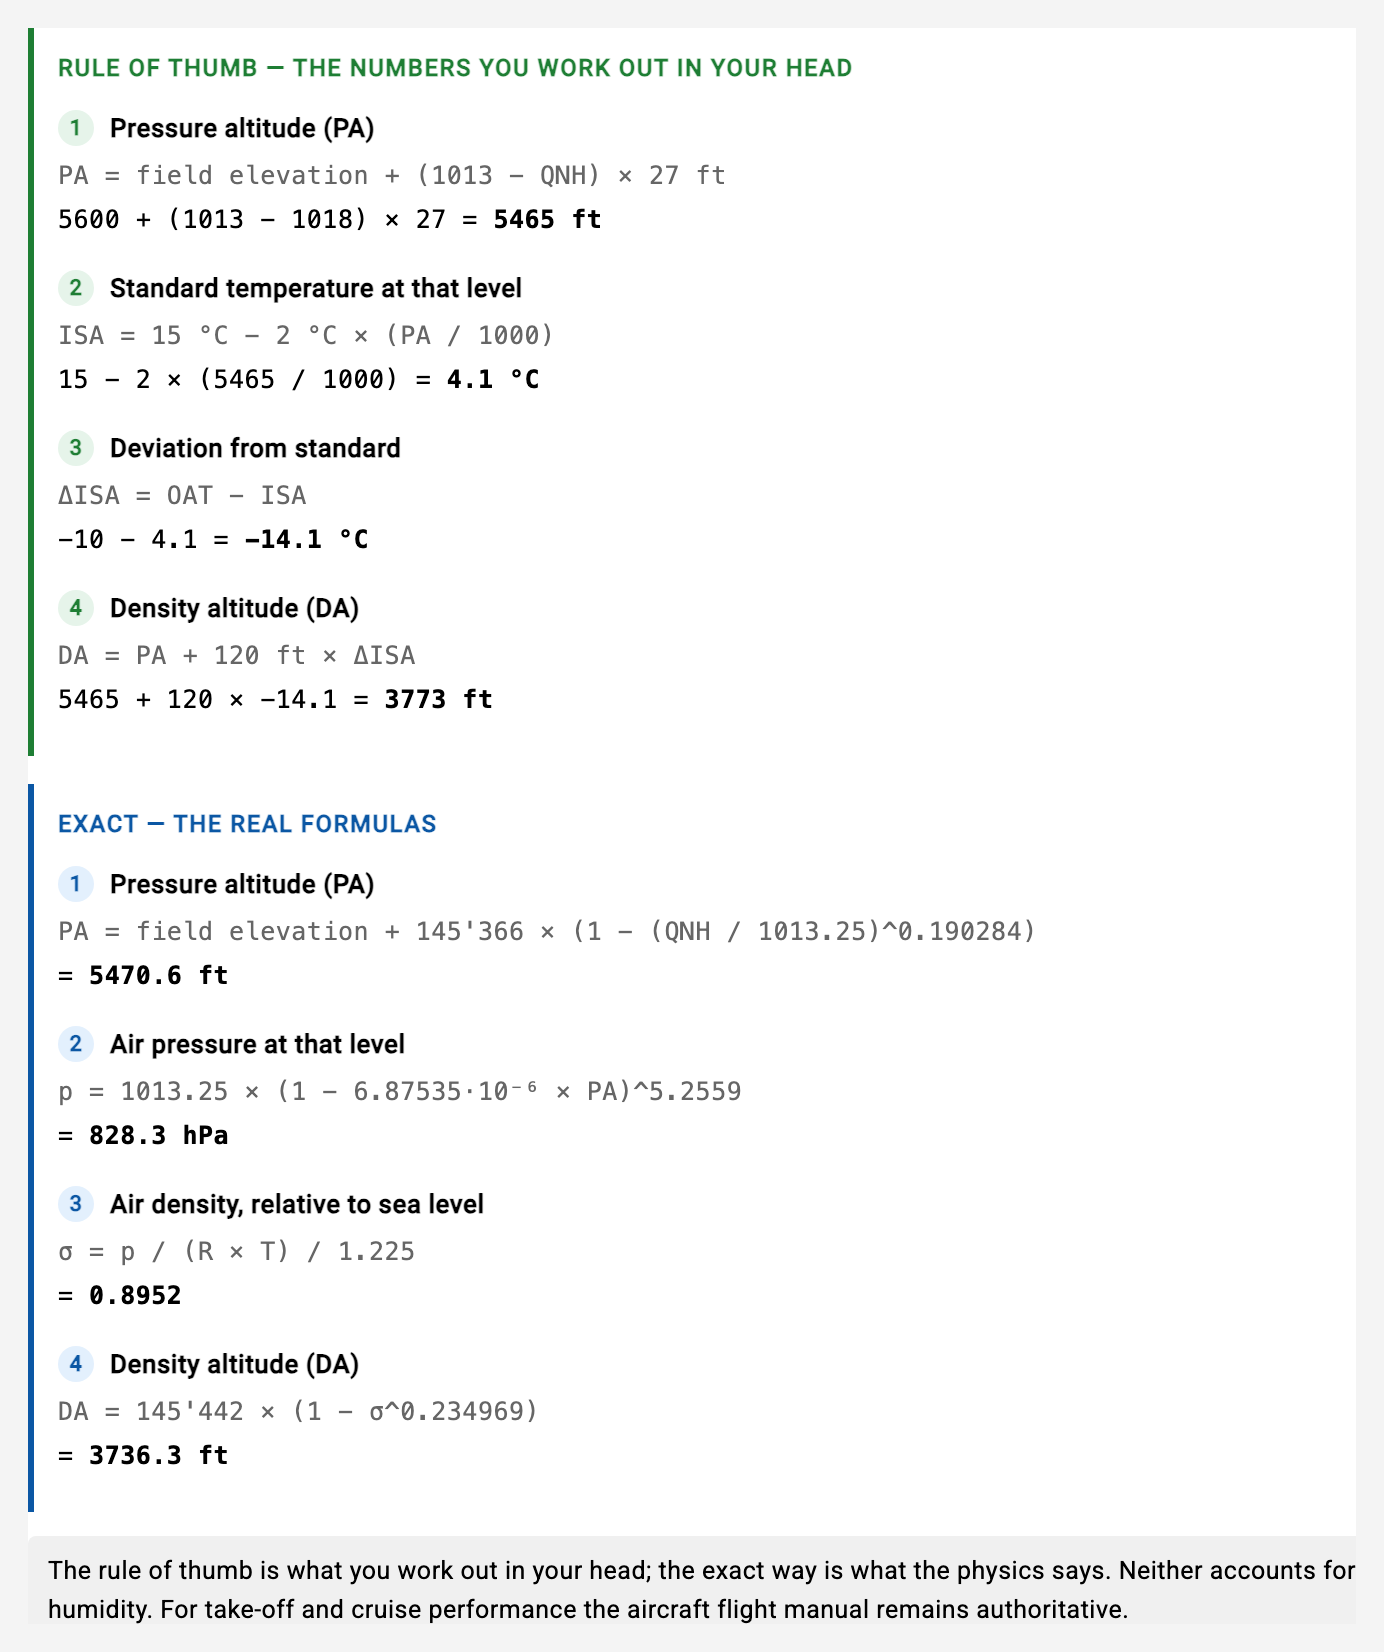
The large figure always comes from the rule of thumb — the calculation you do in your head. Below it, a scale shows how far it sits from the exact calculation:
- The centre is the exact figure; the dot sits where the rule of thumb lands.
- Inside the quiet band the difference does not matter in practice — the dot is green there.
- Outside it, its ring turns amber, and the line below says in plain words by how much.
The colours mean the same thing everywhere: green is the rule of thumb, blue the exact calculation, amber means "this deviation is worth noticing".
This is not decoration. Both altitude rules of thumb sit very close; the 2 % rule for airspeed, on the other hand, drifts visibly with altitude — at 12,000 ft in cold air it can read close to 5 % high. Once you have seen that, you know when the mental arithmetic is enough.
How this is calculated: the derivation can be expanded below the result. It shows both ways one after the other, rule of thumb first, every step with your own figures filled in. The rules of thumb are the ones from flight training:
- Pressure altitude = field elevation + (1013 − QNH) × 27 ft
- Standard temperature (ISA) = 15 °C − 2 °C × (pressure altitude / 1000)
- Deviation (ΔISA) = outside air temperature − ISA
- Density altitude = pressure altitude + 120 ft × ΔISA
- True altitude = indicated altitude + 0.4 % per degree of ΔISA, applied to the height above the field
- True airspeed = indicated airspeed + 2 % per 1000 ft
A QNH above 1013 makes the second term negative — the pressure altitude then sits below the field.
What the calculator deliberately does not do: it computes no take-off distance and no groundspeed. How long your take-off run will be is in your aircraft's flight manual; groundspeed needs wind and heading. Humidity is not taken into account on either route; on a very humid day the real density altitude can be about 200 ft higher.
Your club's own links
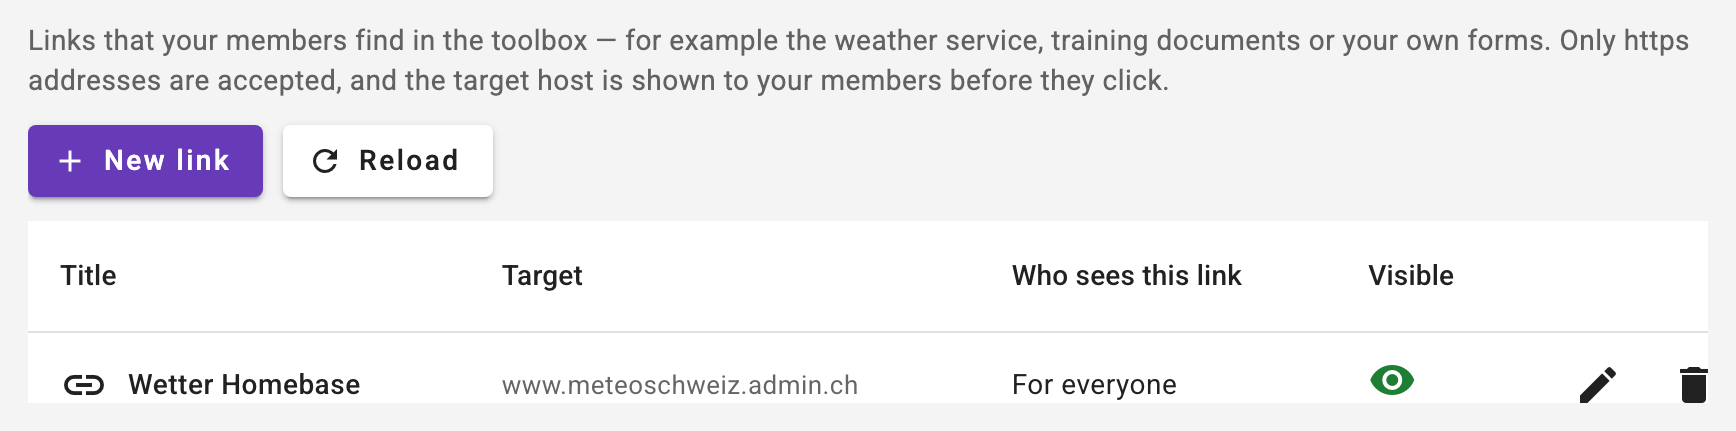
Besides the tools we provide, your club can put its own addresses into the toolbox — the weather service, training documents, forms or authority pages. They appear in the same list, below the tools.
For a club link, the target host and the club it belongs to are always shown under the title. A click opens it in a new window; the app stays open.
Managing links (club owner)
The club settings have a Toolbox step for this — it only appears if the module is licensed for your club.
For each link you enter:
- Title and optionally a description — this is what your members see.
- Address: only
https://is accepted. The server rejects anything else. - Symbol from a fixed set.
- Who sees this link: selecting nothing means everyone. Otherwise pick one or more roles — student pilots, pilots, flight instructors, theory instructors, club owners. This sorts the list and keeps it short; it does not protect the link — whoever knows the address can reach it. Confidential documents therefore belong behind their own access control, not merely behind a role selection.
- Position: the order in the list.
- Visible in the toolbox: switched off, the link is kept but shown to nobody — handy for seasonal entries.
For the club owner
The toolbox and the individual tools are enabled per club. Please contact the operator; your club settings show which modules your club has.