
26. Boarding pass printing
Licence note: Boarding pass printing is an optional module. If it is not enabled for your club, neither the print device management nor the print button on the vouchers is shown.
Vouchers can be printed as real boarding passes on a ticket printer. The printer does not sit in a data centre but at your home or at the airfield: a small computer (Raspberry Pi) fetches the print jobs from AviationHelper and passes them on to the attached printer. This way your network needs no inbound access from outside.
Registering a print device
The club owner registers a device in the club settings, step Print Devices:
- Choose Register device and give it a name (for example "Raspberry Pi Hangar").
- The access key is then shown exactly once. It cannot be displayed again later - AviationHelper only stores its fingerprint. Copy it, or download the file agent-config.json right away; it already contains address and key;
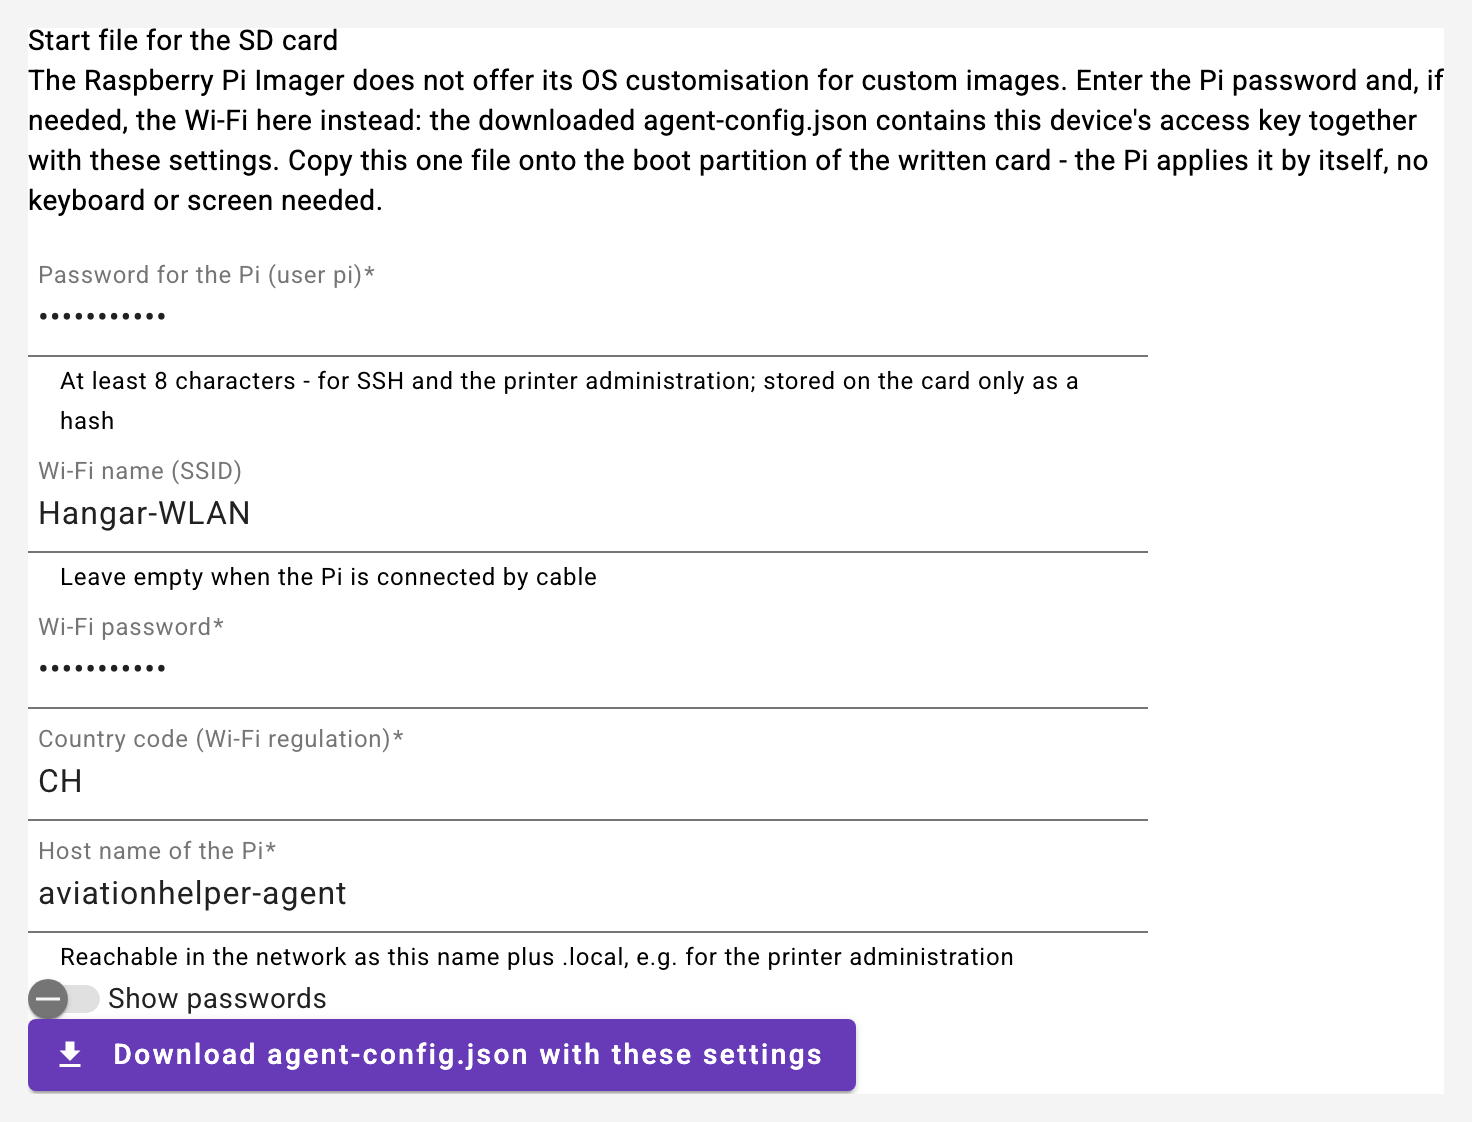
printersis empty, because the Pi detects a Zebra on USB by itself. - Use Download Pi image (right below the key) to get the ready-made SD card image and write it to the card with the Raspberry Pi Imager - just write it, the Imager does not offer its OS customisation for custom images. What you would enter there is produced by the form Start file for the SD card right below the registration instead: Pi password, Wi-Fi if needed (name, password, country code) and host name. Download agent-config.json with these settings delivers a single file - this device's
agent-config.json, extended by these settings (the password only as a hash). The operator publishes the image in AviationHelper - if the button is greyed out, none has been published yet. - The downloaded agent-config.json goes onto the boot partition of the card - the small partition every computer can read; replace the file that is there.
printersis empty - a Zebra on USB needs no entry, the Pi detects it by itself. Only for an office printer (the name of its print queue), a Zebra on the network or an IER you copy the matching entry from the_beispieleblock of the same file intoprintersand adjust it; the Pi does not read_beispieleitself. Then switch the Pi on: it sets up password, Wi-Fi and name by itself - no keyboard or screen needed - and reports to AviationHelper after two to three minutes. What was set up and which address the Pi has is written to the fileagent-setup-status.txton the card afterwards (put the card into the computer for a moment). The printer administration for the office printer is athttp://aviationhelper-agent.local:631with the userpiand the password from the form. - No Raspberry Pi at hand? ZIP for laptop / PC gives you the agent with its configuration ready for a laptop or PC with Java 21 - unpack it, start
start.sh(macOS/Linux) orstart.cmd(Windows), done. The computer has to be running while printing should work.
The list then shows whether the device has reported in and which printers it offers. If a key is lost or should no longer be valid, remove the device and register it again. The agent only reports printers that really exist on the device. When a new version of the agent is published, it fetches it by itself on its next poll - the list briefly says "update follows".
Connecting a ticket printer (Zebra)
A Zebra label printer (ZD220 and relatives) is plugged into the Pi by USB - nothing more. The Pi detects it by itself and reports it within half a minute as "Zebra … (USB)"; nothing has to be entered in the agent-config.json for it. Only a Zebra on the network needs an entry with its address and port 9100 (pattern in the _beispiele block of the same file). Neither a print queue nor a driver is needed: AviationHelper sends the finished ticket as a graphic straight to the printer, and everything the printer has to know travels with the job. This needs an agent of version 1.2.1 or newer - the version is shown on the device card after "Online", and if the agent is too old, the card says so and what to do.
Three steps, once:
- Load the roll and adjust the paper guides; move the sensor over the black mark or the hole of the tickets (see the printer's manual).
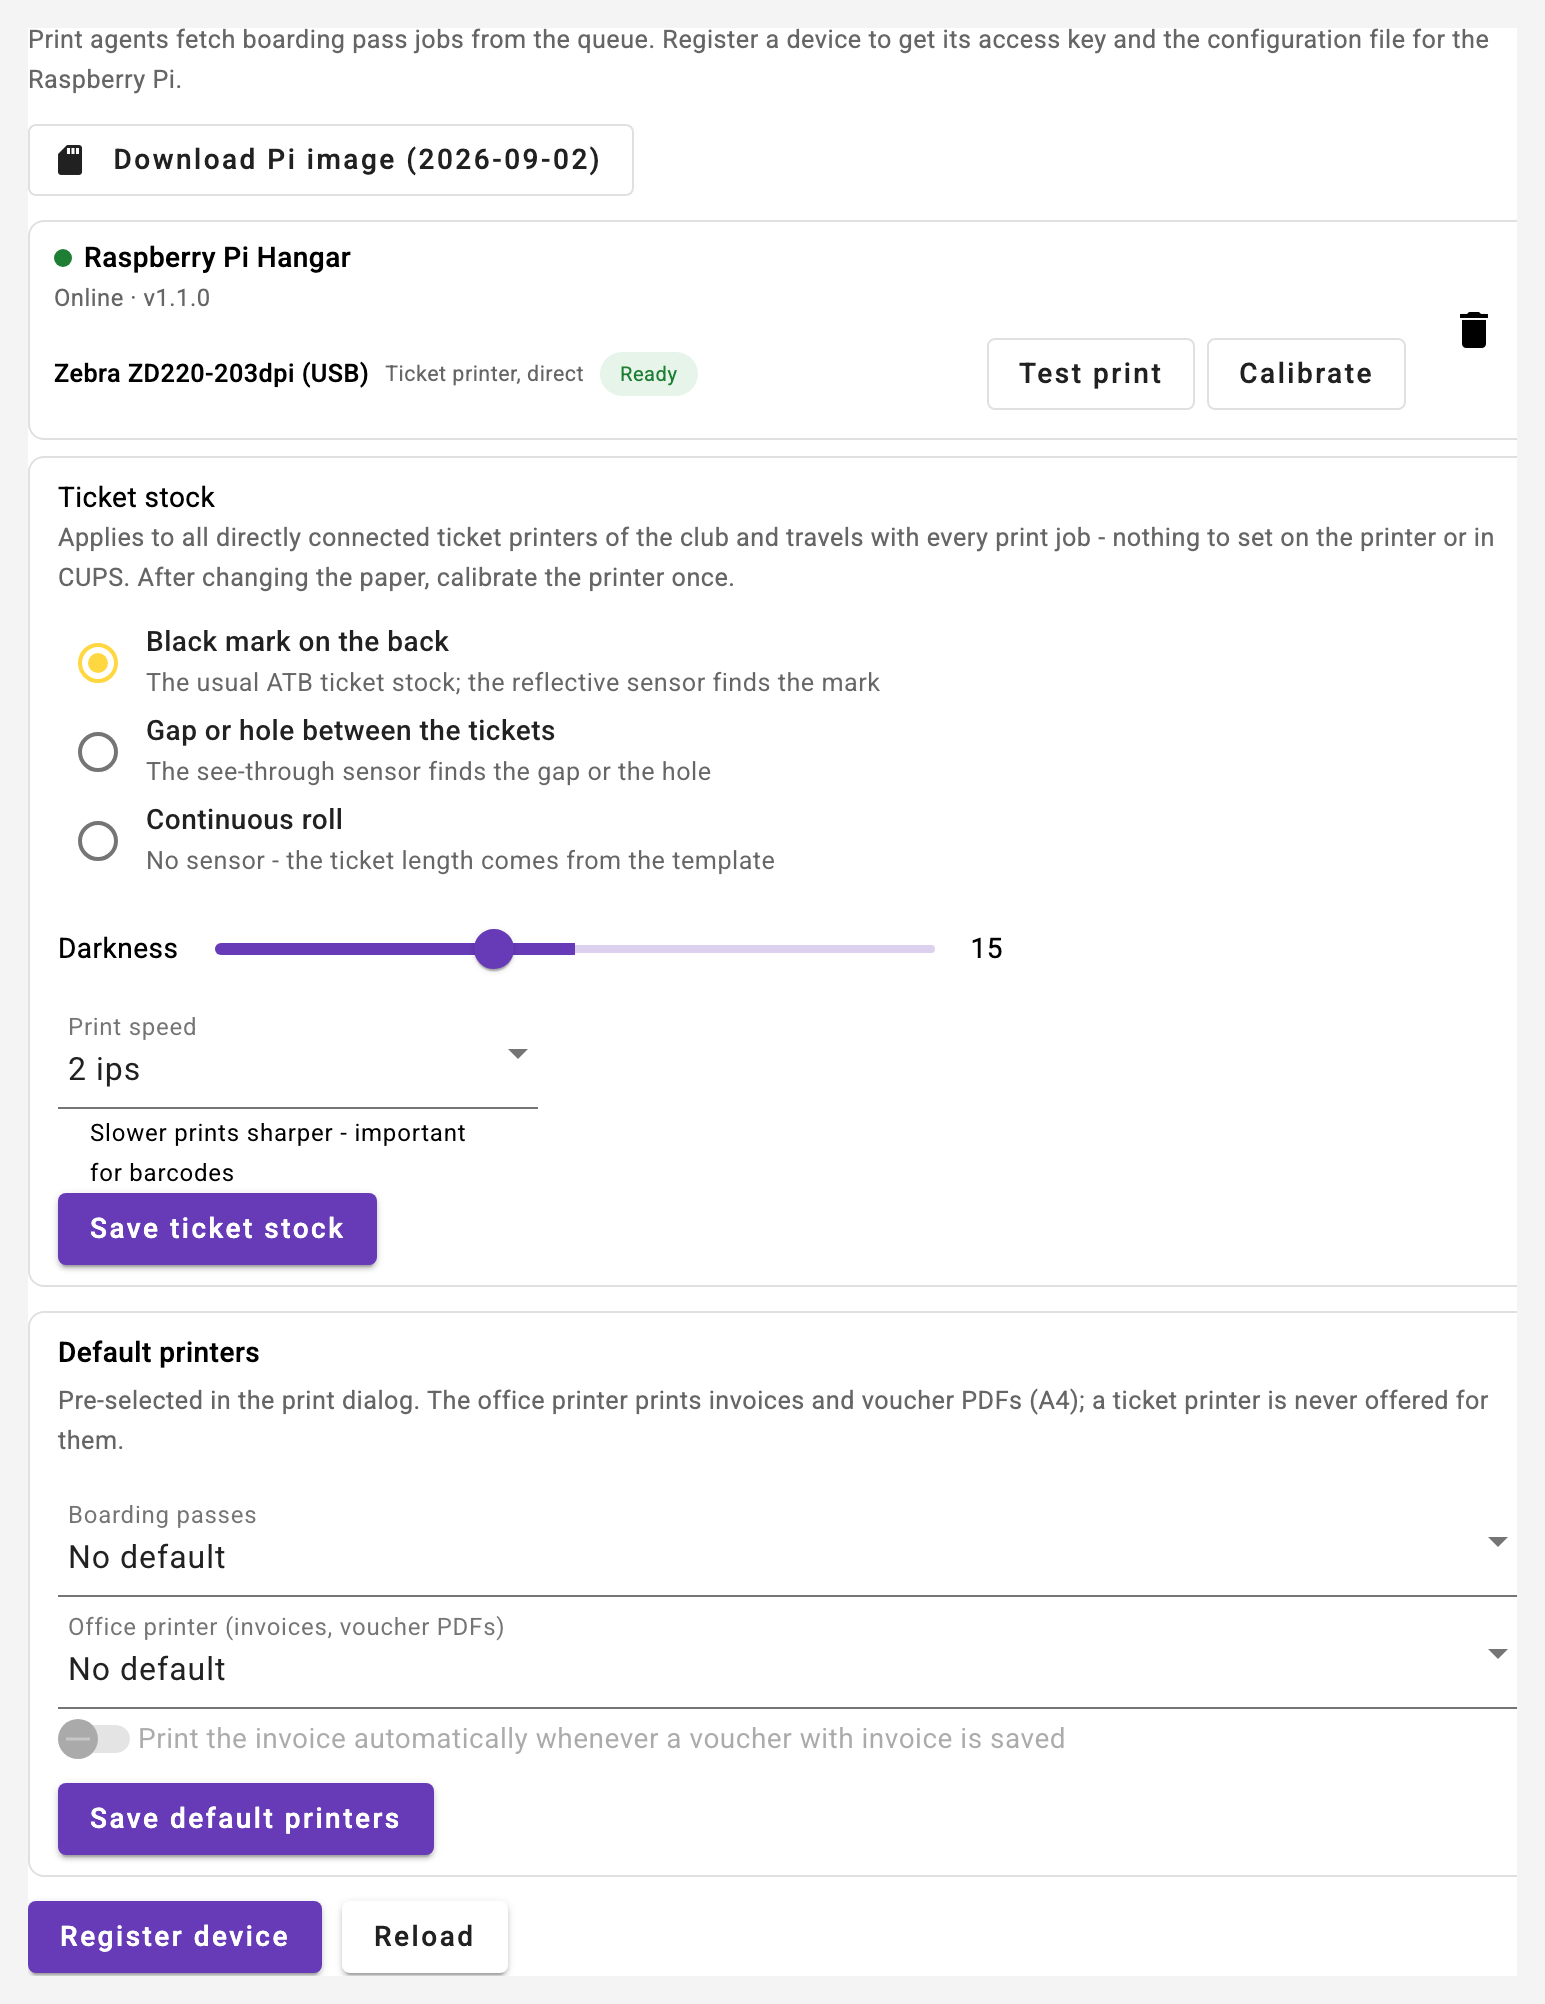
- Choose the ticket stock: In the club settings under Print Devices the collapsed section Ticket stock appears as soon as a ticket printer is reported; its header shows the current setting, expand it to change it. Choose how the printer finds the start of a ticket - black mark on the back (the usual ATB stock), gap or hole between the tickets, or a continuous roll - and set darkness and speed. If the ticket comes out upside down because the paper is loaded the other way round, switch on print rotated by 180°. Below you find the ticket size (width and length in millimetres; empty means the size of the template, 82.5 × 203.2 mm for ATB tickets - the print is fitted into the size you enter), shift print start (the whole print moves by that many millimetres further along or, with a minus sign, earlier) and the tear-off position (how far the printer feeds the ticket out after printing so that it can be torn off at the edge). The printer pulling the ticket back a little before printing is normal: it brings the start back under the printhead after having fed it out for tearing. The setting applies to all ticket printers of the club and travels with every job.
- Calibrate and Test print in the printer row of the device: when calibrating, the printer feeds two or three tickets until it finds the mark; the test print prints the default template with sample data over exactly the same path as a real voucher. Both show up in the queue under Print Jobs.
Every printer row also shows the state of the device as it reports it to the Pi after each job: ready, no paper, cover open, paused or not reachable. A Zebra without paper still accepts the job and prints as soon as paper is loaded again - the job then counts as printed, and the printer row says "No paper".
If the Zebra is red or does not show up: A printer never just disappears - if it is plugged in but not usable, it is listed with a red state and the reason: "No device access" (unplug and plug it in again, otherwise restart the Pi), "No permission" (the agent may not open the USB device - hint in the row), "Wrong printer language" (the printer is set to EPL instead of ZPL - switch it with the Zebra Setup Utilities) or "Not reachable" (a configured printer whose address or queue is wrong). If no printer shows up at all although the device is online, power or cable is missing - or the agent is too old (see above). For a printer in such a state AviationHelper does not accept a job but names the reason.
Updating the agent: When the operator activates a new agent version in the admin area, every device fetches it by itself on its next poll; the device card shows "Update is running", then the new version. If something goes wrong, it says so as well: "Update failed" with the reason (the agent tries again every 30 minutes) or "Update rolled back" when the new version did not start and the Pi went back to the old one - then the operator has to activate another version.
Zebra via CUPS: If you set the Zebra up as a print queue on the Pi before, that path keeps working; it then appears as a printer of its own in addition. For the direct path no queue may print to the same Zebra while AviationHelper is printing - the simplest way is to remove the queue.
Printing a voucher
Every voucher has a printer icon in the action column. It is missing when the module is not enabled for the club. Without an active print device only the PDF preview remains; invoice and voucher PDF need the office printer. Clicking it opens a small menu with the print options; Print boarding pass opens the print dialog:
- At the top you choose the printer, if several are attached.
- At the top of that list is PDF - preview in AviationHelper: instead of printing, AviationHelper shows the finished ticket as a PDF - to check whether a long name fits the field, and to download it. That saves paper and needs no running printer; with an ATB template the printer commands appear as text instead of a PDF.
- Below it you see the details that appear on the ticket but are not stored with the voucher - for example the duration or an extra such as "Pizza in Locarno". They come pre-filled with sensible values and can be adjusted for each print.
- At the bottom, under Print on the office printer as well, tick the invoice (and, if needed, the A4 voucher PDF) - it goes to the office printer as its own job. If the club has set a default office printer, the invoice is already ticked: ticket and invoice are then one click.
Everything else is taken from the voucher automatically: the voucher number, the name of the person it is for, the validity and the club logo. The voucher number deliberately cannot be changed in the dialog.
Add to print queue queues the job. If the computer at the printer is running, it picks the job up within seconds; if it is switched off, the job waits until it is back.
Print status
The printer icon on the voucher is coloured according to the last job - with several jobs the most urgent one counts (error before waiting before printed); in the menu each print option shows its own state:
- blue - the job is waiting or on its way
- green - printed, with the time in the tooltip
- red - printing failed; the tooltip names the reason
You can print again at any time - simply choose the entry in the menu once more.
What "printed" means exactly: The computer reports success as soon as the printer has accepted the job. With a directly connected Zebra it then asks for the printer's state and shows it in the printer row of the club settings - "No paper" or "Cover open", for example. With a printer behind the computer's print queue (office printer) the operating system holds the job back until the printer is ready again. So if no ticket comes out although the status is green, it is worth checking the printer itself.
Invoice and voucher PDF on the office printer
The computer at the ticket printer can drive a normal printer as well - the laser printer in the office, for example. That way you print not only the ticket while you are out and about, but the invoice for the voucher along with it, and pack everything together in the evening.
The invoice is not generated anew: it is exactly the PDF that AviationHelper creates when a voucher with the invoice option is saved. The same applies to the A4 voucher PDF. Both can also be printed on their own - via Print invoice / voucher PDF on the office printer in the voucher's print menu. The entry is greyed out when the voucher has neither an invoice nor a PDF, and shows the state of the last job underneath.
Default printers are set in the club settings, step Print devices: one for boarding passes, one as the office printer. Both are pre-selected in the print dialog - so printing from the phone stays one click. A ticket or ATB printer cannot be chosen as the office printer; an A4 document does not belong there.
Printing automatically: With the switch print the invoice automatically, AviationHelper queues the invoice every time a voucher with invoice is saved - including corrections, because the invoice is generated anew then. The switch is off by default. If an invoice for the voucher is already waiting in the queue, no second job is created.
Connecting the office printer: It is set up on the computer at the ticket printer as a normal printer (CUPS). A network printer that supports AirPrint or IPP Everywhere - which is true of most recent laser printers - needs no driver for that. Afterwards it appears in the device's printer list and can be chosen as the office printer.
Uploading your own templates
The bundled sightseeing flight template can be replaced with your own, and for tickets without a voucher (trial flights, an event stand) you can add as many more as you like. This happens in the club settings, step Print Templates — there is deliberately no design editor: you upload your XSL-FO file.
When you save, the template is immediately test-rendered. If something is broken, the error appears right away and the template is not stored at all — an unusable template never reaches the printer. Preview PDF shows you the result with sample data at any time.
The preview button in the template list shows the template with sample data (voucher F4F-RF-0001 for Martina Muster) - as a PDF in a dialog, or as printer commands for an ATB template. That way you see the layout before the first real voucher is printed.
The key of a template appears in every print job later. If you assign a template to a voucher type, it is used automatically when printing that kind of voucher.
Images are embedded with asset:name; you upload the file at the bottom of the same page. The club logo is available as asset:club-logo without any upload. Other sources — file paths or internet addresses — are rejected by AviationHelper: that is the only reason uploading your own templates is safe at all.
Designing templates in the editor
Instead of uploading an XSL-FO file you can design a template directly in AviationHelper. The editor belongs to the module External printing and is enabled per club on top of it — without it only the upload remains.
In the club settings under Print templates there are two buttons for this: Design a new template starts with an empty ticket, From a standard layout takes a finished layout as a starting point («Boarding pass classic» reproduces the familiar sightseeing ticket, «Plain voucher» is a voucher without a pre-printed form). A template designed in the editor is marked Editor in the list and re-opens there with the pencil button; uploaded XSLT templates are unchanged and are marked XSLT.
The editor shows the ticket lying down, the way it comes out of the printer. Elements are created with Add element and moved with the mouse; the corner at the bottom right resizes them, the arrow keys move them by half a millimetre (five with the shift key). The properties of the selected element are next to it — position and size in millimetres, font size, alignment, rotation. The button next to the Rotation field turns the element by a quarter turn with every click — this works for every kind of element, the barcode, the QR code and the image included. The printer cannot set any angle other than 0, 90, 180 and 270 degrees. The box of the element stays where it is and keeps its size while turning; only its content rotates inside it.
There are six kinds of element:
- Text for free lines, optionally bold, in upper case, wrapping or rotated by 90, 180 or 270 degrees.
- Field for a small label above a large value, like NAME or DURATION on the ticket — with a border and rounded corners if you want.
- Image for the club logo or an uploaded image. "Leave out when the image is missing" makes sure a club without a logo can still print.
- QR code and barcode (Code 128) with any content, the barcode optionally with plain text below.
- Frame for a line or a box.
Placeholders fill in the details of the voucher: {{gutschein.nummer}}, {{gutschein.name}}, {{gutschein.gueltig_bis}} and others; {{klub.name}} and the remaining club details come from the club settings. {{frage:Duration|~ 1h}} creates a field that is asked for when printing — the text before the vertical bar is the label in the print form, the text after it the default. You do not have to remember them: the + button next to the text field opens a searchable list of every field, and the placeholder you pick lands where the cursor last was.
Two previews show the result without using paper: PDF preview renders the template exactly as the printer would get it, and Printer dots shows the image at the resolution of a label printer — there you see whether a fine font is still readable.
Two guides help with alignment: the dashed line across the ticket marks the tear-off line, a blue dashed frame the size of the ticket stock if it differs from the template. If a pre-printed form is among the images, it can be shown as a background — it helps to line things up on pre-printed paper and is never printed.
Save validates the template and test-renders it, exactly as with the upload; Save as a copy creates a second template instead of changing the existing one.
Printing tickets without a voucher
A trial flight or an airfield event needs no voucher. Under Print Jobs (its own menu entry) you pick a template, fill in the fields, enter the number of copies and add the job to the queue. The fields are generated from the template — if a field is added later, it appears here by itself.
Keeping an eye on the queue
The same page shows the devices and their state at the top, and all jobs of the club below: what was printed, what is waiting and what failed, together with the message from the device - test prints and calibrations are listed here too. Each row also names who ordered the job. Three actions are available there:
- Print again creates a new job with the same details; the old one stays as a record.
- Cancel only works while the job is still waiting. Once the computer has picked it up, it is already printing.
- Delete removes the job from the list - a waiting one as well as a printed, failed or cancelled one. Only while the computer is printing it right now does the entry stay. Delete finished jobs above the list clears everything printed, failed and cancelled in one go; waiting jobs remain.
Tickets on an ATB printer (IER)
Besides normal printers, AviationHelper supports ATB ticket printers — the devices used at airports to print boarding passes (an IER 557, for example). They do not speak PDF but the AEA protocol over a serial connection.
The path is the same as for a normal printer: template, queue, agent. Only what goes onto which line at the end differs. Two things are different when setting it up:
- The template has the output format AEA. Its content is plain text with
${name}placeholders instead of XSL-FO — what goes in it is defined by the AEA specification of your printer (field positions, font sizes). AviationHelper transports the message; designing it is up to you. - AEA only knows ASCII. Umlauts in the template are rejected when saving; umlauts in the values (real names) are transliterated automatically — "Jürg Müller" becomes "Juerg Mueller".
On the computer at the printer you configure the serial connection: port, baud rate, data bits, parity and stop bits. These values are printed on the self test page of the printer — most devices print it when switched on in offline state with the test button pressed.
Before a ticket is printed, the agent asks the printer for its firmware version. If the device does not answer, nothing is printed at all and the queue shows a message with the configured values — in that case port or baud rate is almost always wrong.
A job never ends up on the wrong device: AviationHelper checks before queueing whether the selected printer can print the format of the template at all.